Quick Tips: How to get dreamy reflections when shooting underwater photos?
This week on Instagram, I’m launching a new series of quick photography tips covering underwater, night sky, adventure travel, and brand photography. Every Tuesday, I’ll answer one of your questions with a new tip on my Instagram and Facebook stories, along with a detailed article right here on my website to help you master each tip. To start the series, we are going to jump into a common question I get asked a lot about my underwater photography.
Q: How can I create those dreamy reflections when photographing close to the surface?
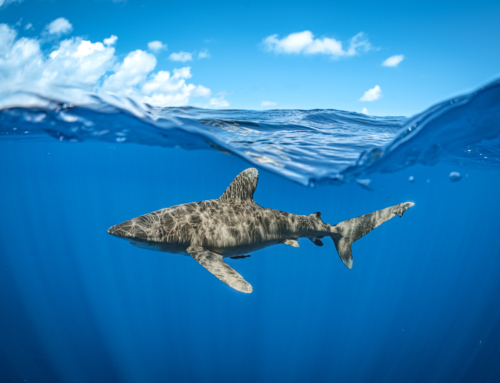
This technique is more straightforward than many believe. It requires some practice to master, but once you get the hang of it, you’ll be able to recreate it consistently. Start with the camera positioned just below the subject’s eye level. You have some flexibility here depending on your preferred shot style. Most of the time, I like to shoot slightly below eye level, as it softens the angle and appears more subtle. To capture the reflection, tilt your wrists slightly to point the camera toward the surface—only a few degrees—to avoid the impression of shooting from below. Remember, we’re not aiming for perfect mirror-like reflections. Instead, we want to capture the color variation across the water’s surface, for reasons I’ll explain shortly. I suggest trying different angles to discover the one that gives you the effect and style you’re looking for.

If you’ve learned how to properly shoot from the hip—meaning without looking through your viewfinder or screen—this trick becomes even simpler. You could be snorkeling at the surface and still make the shots appear as if they were taken a few feet underwater. As you improve, you’ll also be able to track your subject and change angles throughout the shot to quickly capture different compositions of the same moment.
Adding surface reflections to your shot helps create depth and leading lines in your photos. These reflections can guide the viewer’s eye toward the main subject, drawing them into the image. Additionally, reflections aren’t limited to only shooting near the surface; the same technique can also be used at greater depths to add texture to the background. This enhances the composition by making it more dynamic than a flat blue background. The textured background provides dimension and depth, helping the subject stand out and appear to pop off the background.
Want to elevate your photography skills or master the art of shooting from the hip with confidence? Join one of my online classes or in-person workshops and let me help you to perfect your technique. Or if you’re getting ready for your next trip, check out my personalized one-on-one online classes or refreshers via Zoom to be ready to capture epic shots on your next adventure!


Leave A Comment